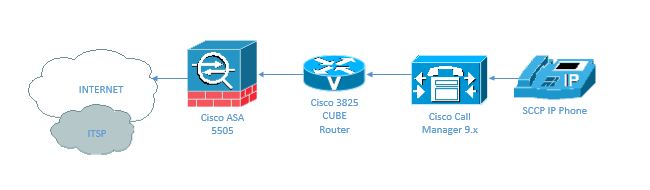
So you’ve decided to step-up and get a “Big Boy” phone system. You’re done with CME and you’ve moved to Call Manager (Cisco can call it whatever it wants, but to many of us it will always be Call Manager). But wait, there is a problem… Call Manager won’t natively peer to your ITSP, so what do you do? While there may be many solutions, the best one that I have found involves using Cisco’s Unified Border Element or CUBE. CUBE, for those of you new to Cisco voice technology is a fancy term for a SIP proxy. The CUBE pairs with your ITSP and routes calls to and from your Call Manager via SIP or H.323 . Below is the topology that I am working with. Yours may look a little different and we’ll get into these differences as we progress.
 I mentioned topology differences and the biggest one is probably the firewall (ASA 5505) sitting between my CUBE and my ITSP. In an ideal world I’d give my CUBE router a public address and let it talk directly to the internet, this is not an ideal world. My ISP is small and stingy with their public IP addresses. It took a few fights and some extra cash to get one dedicated public IP on my ASA and getting a second is simply not worth the trouble. I’ve read all of the stories regarding trying to pass SIP through a firewall and while there are some caveats, I’ve made it work.
Connectivity is Everything…
It seems like a simple enough statement, but in terms of building and maintaining voice network connectivity really is everything. I prefer to keep it simple and the simplest way to build my topology was to keep the same protocol throughout. With the exception of the SCCP Phone (Call Manager does just fine translating SCCP to SIP and vice versa) every other connection is SIP.
- Call Manager to CUBE & CUBE to Call Manager – SIP
- CUBE to ITSP & ITSP to CUBE – SIP
By keeping the majority of my transactions SIP, I take away at least one point of failure. I mentioned earlier that you could configure the CUBE router connection to CM via H.323 and while I know that configuration can work just fine, why make it more complicated than it needs to be? The biggest thing to keep in mind when deciding on connectivity is “Can I troubleshoot it easily when it does not work?” Its a lot easier to look at a straight SIP trace.
Bring on the configs…
We’ll start with the CUBE first (This CUBE is running archaic 12.4 code).
The voice service commands are pretty standard. In the allow-connections section sip to sip is the key portion. Remember to configure your sip registrar settings here as well.

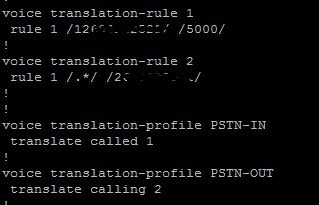
The next piece we’ll look at, are the voice translation rules. The first rule points my DID (I only have one in this scenario) to an extension on my CM. The second rule puts my DID as the number mask for all outgoing calls. Without this second translation, I’d have to do additional configurations in CM, the translation rule is easier.

Now, we’ll look at the dial-peers. I’ve got one for the incoming calls (from the ITSP) (Dial-peer 2) One for outgoing calls (I’m just dealing with LD calls right now) (Dial-peer 10) and one for communication with CM (Dial-Peer 100). Note where I applied my translation rules.

Finally, we’ll look at the SIP-UA (SIP User Agent) configuration. This is the actual heart & soul of CUBE. This is the connection and authentication to the ITSP. You may find that your ITSP we’ll peer with your specific public IP address rather than give you a user-id and/or password. Peering with an IP is in theory much more secure as spoofing an IP end to end is much more difficult. Notice the credentials and authentication sections. They both include a username and password. The credentials line identifies your CUBE to the ITSP and the authentication line gets you through door.

Next, we’ll take a look at the CM trunk configuration (My CM is 9.x)
First the initial configuration of the trunk. You’ll assign your device pool, media resources and things of that nature here…

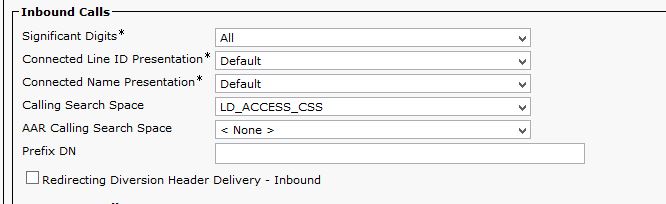
Now, we’ll look at the incoming calls section of the trunk config. You’ll want to make sure that you direct inbound calls to the Calling Search Space that includes the Directory Numbers that you intend to answer the calls. You can also adjust things like significant digits. Generally speaking, I always want the CUBE/router to send me everything and then I’ll configure CM to pick and choose what it wants.

Finally, we’ll look at the connectivity section of the SIP trunk config. Here you’ll specify the address of your CUBE and your SIP and SIP Security profiles. These are standard profiles from Cisco and no tweaking is required to make this work.

Like most other things that Cisco creates, there are far more options in the trunk configuration than most configurations will require.
Finally, lets take a look at the ASA (This ASA is running 8.4(7) code)
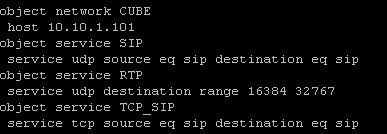
First, we’ll take a look at my network and service objects. For this scenario, I defined the RTP range and SIP protocols. While not necessary, I defined SIP with both UDP and TCP entries.

Next, we’ll take a look at the NAT statements. While the CUBE is not a NAT aware SIP Proxy, the ASA provides some assistance in maintaining the end to end SIP headers required for successful peering and usage.

Finally, we’ll take a look at the access-list portion of the configuration. These are pretty straight forward…

Additional Notes…
The phone & route pattern configurations for this example are not impressive. The phone (7961) is configured with a Directory Number and pointed at a CSS with access to PSTN calling features. The basic route pattern is configured as 9.1XXXXXXXXXX and pointed at the SIP trunk created above. I discard the 9 (pre-dot) and send 11 digits to my ITSP. You don’t need the 9 but it keeps the scenario in line with most business systems.
I’ve struggled to find an ITSP that supports a true integration with the CUBE. There are several ITSPs that work with Asterisk and other open-source IP PBX platforms but CUBE is its own animal and as such these “Asterisk ITSPs” usually don’t work properly or in many cases don’t work at all. When I came across FlowRoute http://www.flowroute.com I was initially skeptical but as I’ve used their service more and more, I’ve become a bigger and bigger fan. The first thing that you’ll notice about FlowRoute is that anyone can try it out. Simply sign up and you’ll get some free time (minutes to place test calls) to peer with them and try your system out. If your system doesn’t work and/or you aren’t happy with the performance, go another direction. If (and this is much more likely) you really enjoy the service. Deposit some money, purchase a DID and keep on going.
Final Thoughts…
I hope this example configuration has helped someone. What I’ve shown is not difficult and is actually quite simple when compared to other voice configurations. That being said, we all need to learn somewhere and hopefully I’ve helped someone do that.
**DISCLAIMER** All information posted in this article was accurate as of the date/time it was posted. Images posted in this article follow the same copyright guidelines as the article itself. Plagiarism is not a gray-area issue, it is wrong and in some cases illegal. If you like this article link to it, do not copy it.
© Wednesday, September 24, 2014 – justinvoip.com – All rights implied & reserved