UCCX Series: Managing Your Audio Prompts

As long as there have been contact centers utilizing UCCX, there have been audio prompts. As an engineer, you know them because you have probably had to help create them, remaster them so that they actually work or even in a pinch record them yourself. We all have at least one number that we can call and hear our own voice welcoming callers to a bank, bakery or auto repair shop. Prompts are a necessary evil, but why are they so evil? Why didn’t Cisco give us a recording application? Why did they point us to the horrible “Media Master” interface in Unity/ Unity Connection as our default option?  While I cannot answer those questions, I can provide a better solution.

A Prompt Management Application…

Think about it, we have everything we need. UCCX provides annunciation, menu infrastructure and the ability to build/record files right out of the box. We have everything we need, we just need to put it together.

While the purpose of this blog is not to give, but rather to inspire, there are places online where you can find prompt management applications that others have written. I’ll show you the ins and outs of mine in the hopes that perhaps you’ll want to build your own.

Prompt Record 1

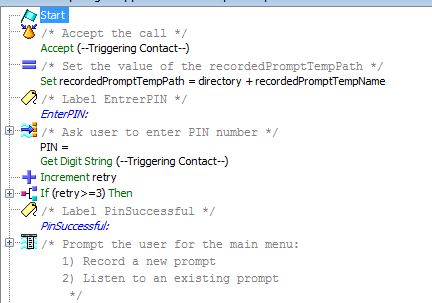
After the Start, Accept (if you don’t know why these two are important a UCCX basics course is probably your first best bet) we set a temporary path in the memory for our new prompts (shown above, click to enlarge), just because you record a prompt does not mean you have to save it. This application bases prompt save names off of 4 digit numbers. Friendly names for prompts are great but not all that useful from a telephone keypad. After defining that temporary path I ask my callers for a PIN, this is a simple authentication step that UCCX has built into its arsenal of objects. If you want to get more secure, you can base the authentication on a User ID and password from the UCCX user list but I don’t have a need for that here. TIP: If you make the PIN a parameter in your configuration, you’ll be able to change it easily from the application page in UCCX.

Once a successful PIN is entered, I give my caller two choices; record a new prompt or listen to an existing prompt. To me, this is a big deal. There are some applications that only allow the caller to record a prompt, that is fine, but for me the ability for the caller to listen to an existing prompt before changing it makes the application much more powerful.

Prompt Record 2

The image above (click to enlarge) shows the listen section of the application. If you store your prompts in the default paths i.e. en_US or whatever language you need this is very simple and straight forward. If you store prompts in multiple hierarchical folder locations you’ll have to call those locations out in your script. As you can see, this works with a formula that takes the prompt name (number) entered by the caller and adds .wav to the name.

Recording prompts take a bit more programming but as you’ll see below it is relatively straight forward (click to enlarge).

Prompt Record 3

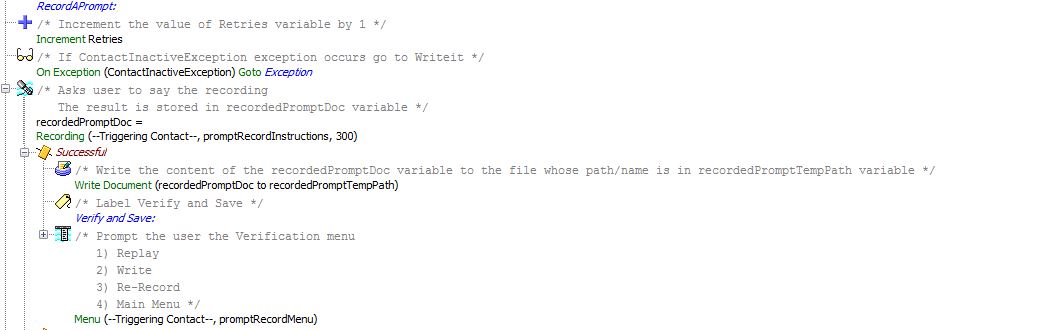
If the caller wants to record a prompt, the first thing that this application does is ask them to record it. You could ask for a file name first but technical order of operations is to create and then save so this way makes more sense. Once the caller records their prompt, the application allows them to replay, re-record, give up and go to the main menu or save the prompt. If they choose to replay (the importance of that temp directory from before) we replay the temporary prompt from memory. If they choose to save, that is where the magic happens.

Prompt Record 4

As you can see above (click to enlarge), the save function of the application utilizes several different parts. First, we ask the caller for a prompt name (number). Besides being practical from a telephone keypad, the prompt numbering method allows you to take a list of prompts and number them for your vocal talent. As they go through and record and save, they are creating a script that can be referenced weeks, months and years down the road as verbiage from the prompts has to change. Once the prompt name (number) is entered we play a confirmation and ask the caller to confirm the save. If confirmed, we write the prompt in the prompt directory (default or specified) and the action is complete. To make the saving of the prompt possible, we do have to give the application administrative rights. What this means is that we have to reference an administrator username and password in the script. TIP: Create an administrator user and password that is exclusively used by your script, do not use your primary admin user.

The last screen shot that I want to share is the variable list from the prompt management application (shown below, click to enlarge). I’ve blocked out usernames and passwords but you get the idea. You can see all of the prompts you need for the prompt management application, this gets into the philosophical discussion of which came first; the prompt or the prompt recording application.

Prompt Record 5

Once your script is complete, you simply create a UCCX application and build a trigger.

While it takes some work to build initially, you then have an application that you can deploy on all of your UCCX builds in the future. It is a quick and easy way to give your customers or stakeholders value-add or at the very least impress someone and I promise it will make your life easier as you administer these systems going forward.

Thanks for reading, if you have questions post them below and we’ll have a discussion.

-Justin

Cisco’s Virtual CUBE & Modern IOS Toll Fraud Security

Good Morning Web World!

I found myself with a little bit of time this morning and I thought I’d share a bit of my latest tinkering.

Those of you that have followed this blog for a while may remember my first post where I talked about pointing a CUBE through an ASA out to my ITSP, Flowroute. That post is located here for your reading pleasure.

While the software/hardware has changed with my setup the idea is basically the same. I still have a CUCM system (now 11.x) running with a phone (I’ve felt like being different lately so currently I’m using a retro 7985G as my endpoint (G in this case does not mean Gigabit)). I also have a firewall, a Cisco 5506-X (it was time for an upgrade from the 5505) and I do still have a CUBE. My previous CUBE was a 3825 and it worked wonderfully but the 3825 has long since outlived its relevance in today’s enterprise environments. In my stack of possibilities I also have a 2921 and while it is still a very powerful and valid router, it just seems too easy.

Simple and straight forward is great but only until you’ve done simple and straight forward, then it becomes time to mix it up.

To that end, my replacement CUBE is virtual. Yes, I said virtual. If you follow Cisco and their products, you may already know about the Cloud Services Router, the CSR1000V. The CSR1000V is a virtual router that runs on a VMWare ESXi host. It runs IOS XE though there is some Linux/Unix on the backend that makes it tick.

ESXI Virtual CUBE

Virtual CUBE Show Commands


When I first heard that it was possible to turn a CSR1000V into a CUBE, I was skeptical. As I have worked through the configurations and witnessed it work, I must say I am impressed.  The configuration is the same as with any other IOS XE router with exception of the interface naming conventions. There are three (3) Gigabit Ethernet interfaces and they are named Gigabit Ethernet 1, Gigabit Ethernet 2 and Gigabit Ethernet 3.  The configuration in ESXi is shown below.

CSR1000V Interfaces Config

In my case, I created three (3) separate interfaces on my vSwitch and pointed them at three (3) separate VLANs in my infrastructure. You could bond/Port Channel these interfaces if you wanted too but you will still be limited by the throughput of your host’s uplink(s).

A few important things to note…

  • When you deploy the OVA file in ESXi you are given a choice of multiple router “sizes” i.e. memory and processor. I am using the smallest size which is one vCPU and 4GB of vRAM. Some of the larger installations require an additional license.
  • Keep in mind that I am testing this configuration in a controlled lab environment. I am not sure of scalability and if you read Cisco’s CUBE configuration guide, located here, you’ll see that the virtual CUBE does have several restrictions that may make it impractical for some organizations.
  • The CSR1000V is a fully license-dependent platform. Once the demo runs out the router runs, but only with throttled performance. If you intend to deploy this solution, you will have to purchase licensing.
  • In my previous post, my 3825 CUBE was running 12.4 IOS which did not include Toll Fraud Prevention, starting in 15.x and moving through IOS XE you need to be mindful of TFP and what it means when you are trying to make/receive calls on a Cisco H.323 or SIP Gateway.

Let’s talk for a moment on Toll Fraud Prevention. As stated above, all modern IOS and IOS XE versions include Toll Fraud Prevention mechanisms and if you use a router, physical or virtual, for voice you need to be aware of them.

Voice Service Config


If you look at the configuration snippet above, you’ll see that in the voice service configuration there is a trusted IP Address list. That list contains the IPs of my ITSP and my CUCM. If I remove those IPs from the list, calls fail. If you are linking your CUBE or gateway to multiple CUCMs or other systems you’ll want to have those IPs in that list as well. What this list does is let the good/known IPs in to complete transactions/calls on the gateway/CUBE and keeps the unknown/bad IPs out to prevent them from placing calls on the system. IP addresses that are part of dial peers will be added to the list automatically but will not show up in the configuration.  If you’ve ever set up an IP PBX on internet, you know that Toll Fraud is a real and serious threat. If you don’t want or need this feature you can turn it off by entering “no ip address trusted authenticate” in your voice service configuration. This is not a recommended configuration but in your environment the TFP mechanisms may do more harm than good.

Thanks for reading, I hope this has been informative.

-Justin

When Good VTP Goes Bad

Just a quickie tonight folks…

I am expanding my network and relocating my servers and other “noisy” hardware to my basement. The cooling value of the dry subterranean environment is great but in all honesty I’m trying to keep my better half happy and my office is not a great place for network gear and servers apparently.

With this relocation I am expanding my switching infrastructure from my core 3560G to include a 2960G as well. The addition of this switch gives me the opportunity to play with VTP or the VLAN Trunking Protocol.

VTP is a Layer 2 protocol that allows you to configure all of your VLANs on the “server” and then feed them down to the “clients”. VTP is a proprietary Cisco protocol and for large, diverse networks it may not be the best option but for me it works, at least it was supposed to.

I say supposed to, because I configured it, using version 2 and nothing happened. Below are my configurations…

CORE-3560G-01(config-vlan)#do show vtp status
VTP Version capable             : 1 to 3
VTP version running             : 2
VTP Domain Name                 : SPRNET
VTP Pruning Mode                : Disabled
VTP Traps Generation            : Disabled
Device ID                       : 000a.b8d3.0400
Configuration last modified by 10.10.0.254 at 8-22-16 01:52:57
Local updater ID is 10.10.0.254 on interface Vl1 (lowest numbered VLAN interface found)
Preferred interface name is gig0/49

Feature VLAN:
--------------
VTP Operating Mode                : Server
Maximum VLANs supported locally   : 1005
Number of existing VLANs          : 23
Configuration Revision            : 0
MD5 digest                        : 0x85 0x94 0x36 0x46 0xC1 0xCE 0xE0 0xD0          
                                    0x87 0x0A 0xF2 0xD4 0x24 0xD0 0xF8 0xD2
BASEMENT-2960G-01#show vtp sta
VTP Version capable             : 1 to 3
VTP version running             : 2
VTP Domain Name                 : SPRNET
VTP Pruning Mode                : Disabled
VTP Traps Generation            : Disabled
Device ID                       : 0017.594c.b180
Configuration last modified by 10.10.0.244 at 3-15-93 06:29:46

Feature VLAN:
--------------
VTP Operating Mode                : Client
Maximum VLANs supported locally   : 255
Number of existing VLANs          : 5
Configuration Revision            : 0
MD5 digest                        : 0x7D 0x73 0xB1 0x19 0x35 0xDC 0xE2 0xA8
                                    0x3A 0x07 0xE0 0xBF 0x92 0xFA 0x53 0x2A

As you can see everything looks like it should work. My passwords match and my domain matches but still no joy. After banging my head on my desk to figure this out, I see the below error message at the bottom of my client’s VTP status.

*** MD5 digest checksum mismatch on trunk: Gi0/21 ***

What is this error? What does it mean?

What it means is that the key exchange between the VTP server and client is incorrect and thus no one talks. What it also means is that I am hitting a long running bug. See the Cisco forum post here

If you read that post, you’ll find the fix, but here it is for your reference.

Basically, you need to make your server regenerate its MD5 Checksum value. Once that value is regenerated, VTP messages are exchanged between the server and client(s) and VLAN joy is had by all. To regenerate this value, simply create a new Layer 2 Vlan.  A simple fix for a complex problem. For those of you that want to upgrade code to solve the problem, good luck, Cisco hasn’t fixed this bug in over 20 revisions of IOS software.

I hope this has helped someone, thank you for reading.

-Justin


Revisiting Cisco Jabber SRV Records

From time to time I like to revisit previously discussed topics, today is the day for Cisco Jabber SRV records. Previously I had written a post talking about internal Jabber SRV records and how to configure and use them. That post is located here for your viewing pleasure.

The truth is that internal SRV records, when it comes to Cisco Jabber, are only half of the story. To tell the whole story, you need to have at least a partial understanding (and hopefully a working knowledge) of Cisco’s Collaboration Edge. If you do not, this will be a bit out of context for you, but the theory is easy enough to understand.

So you have an on premise Cisco IM & Presence installation and you have users on your internal network that are using Cisco Jabber. It is a very powerful business tool; instant messaging, screen sharing/control, and desktop video/voice all from one convenient and surprisingly well built application. What happens when your users leave your internal network? Do they VPN? Do they use WebEx? Or perhaps something less IT friendly? What if they could use Cisco Jabber wherever they are, without the hassle of VPN and securely from any device? The truth is, they can!

In comes Collaboration Edge, it goes by a few other names, but this post isn’t about Collaboration Edge…directly, its about a very handy SRV record that sits on your external DNS server(s) to make the Collaboration Edge integration possible. For a 1000ft view, Collaboration Edge includes two appliances, one on the LAN and one on the Internet or DMZ. These two appliances talk together using magic, pixie dust, tiger blood and SSL certificates (those are the ones that really scare me, but that is for a different post). With these two appliances talking, they are also linked to CUCM and voila’ we have extended CUCM’s capabilities to the information super-highway known as the Internet. It’s certainly not that simple, but you get the idea.

We know from my previous post that Cisco Jabber can discover it’s  network services via DNS SRV records. Internally it can discover both CUCM (for directory services and service profiles) and IM&P (for login and instant messaging, etc.). The process for discovering services outside of the network is very similar, but the differences are worth noting.

Cisco Jabber always searches for the same services i.e. SRV records no matter what network it is on. Whether it is on your internal network or just sitting on the Internet i.e. a home network the discovery is the same.

When you put in your Jabber ID (JID) i.e. someone@somewhere.com Jabber queries the following records based on the domain of your JID.

  • Jabber looks for WebEx Connect (Cloud instant messaging services).
  • Jabber looks for Internal SRV records i.e. cuplogin and cisco-uds (as shown below).

_cisco-uds._tcp.example.com

_cuplogin._tcp.example.com

  • If Jabber does not get a response from either of these records it looks for collab-edge which is pointing at the Collaboration Edge – Internet side appliance from earlier (as show below).


_collab-edge._tls.example.com

The collab-edge record configuration looks like this…

_collab-edge._tls.example.com   SRV service location:
          priority       = 3
          weight         = 7
          port           = 8443
          svr hostname   = vcse1.example.com


Assuming that no other records above the collab-edge record answer, Jabber sends its login request to the device attached to SRV record and logs into internal IM & Presence server as well as CUCM and any other services configured in the service profile.

A couple of import things to remember when talking about external DNS. First, some well-meaning DNS administrators will put a catch-all in their external DNS configuration so that anything destined for *.somewhere.com goes to their website. This is fine, but it will break your external Jabber connectivity. This break occurs because even though it doesn’t exist cuplogin.somewhere.com will still be caught by the catch-all. Second, collab-edge goes in the external DNS environment only. Just like cisco-uds and cuplogin are only internl, collab-edge is only external. Forgetting or disregarding this will surely make your troubleshooting much more interesting to say the least…

I hope this has been helpful to someone. Cisco Jabber is a power tool and when paired with Collaboration Edge the possibilities are endless. Hopefully some day soon I’ll be able to write a series about Collaboration Edge and its many facets but until then, thanks for reading.

-Justin

The Upgrade Follies: Communications Manager 9.x to 11.x

If you’ve been in the Cisco voice game for more than a second, you’ve probably done a Call Manager upgrade or two. In my case, I lost count around version 4.1 to 4.3. My record for the longest upgrade that I was a part of is 72 hours…straight! It was painful but such was life back in those days.

With the advent of virtualized Cisco voice and all of its associated parts the upgrades have definitely improved, but that does not mean that the gotchas aren’t still lurking.

For one of my current customer projects I am upgrading a virtualized 9.x environment to 11.x. Unity Connection was upgraded first using CLI. CUC luckily doesn’t have a whole lot of gotchas assuming the engineer that built it originally used an OVA template and followed the correct steps. All you need to do is apply the new “keys” COP file (ciscocm.version3-keys.cop.sgn) and you are good to go. Maybe it isn’t quite that easy, but you get the picture. Communications Manager (Call Manager) is a far different animal. For the sake of automation, I’m doing the CM upgrade using Prime Collaboration Deployment (PCD). PCD is a separate application server that comes with your upgrade order on Cisco’s Product Upgrade Tool (PUT). PCD basically allows you to take a CM cluster (including IM&Presence) and script the upgrade so that you can basically click once and wait. If only it were that easy…

There are a couple gotchas that I’ve learned the hard way. I’ll list them below, hopefully they can help you out during your next upgrade.

  1. Licensing. If you are going to do an upgrade, do your homework. I could write an entire post on licensing but for a 9.x to 11.x upgrade it really just involves doing clean up. If you are getting that ugly little licensing warning from Cisco when you log into your system, clean it up before attempting to upgrade, you’ll save yourself from a lot of pain later.
  2. Disk Space. I get it, hard drive space is cheap, but OVAs are not future proof. The original mid-size build OVA for CM 9.x specified an 80 gig virtual drive. The 80 gig drive model is not not supported by fresh 11.x installs. What bites engineers in the ass is a pesky little storage location known as the common partition. When the 11.x upgrade script first verifies that an upgrade is possible, it checks the amount space available in that common partition, if less than 25 gigs space is available the upgrade will fail. There is an excellent Cisco Support Forums post about this failure here.  So what do you do if the above scenario is true?

There are 3 options…

  1. You can go into your server’s TFTP directory and manually remove old crap that you don’t need. If you happen to remove crap that you do need, bad things WILL happen, so keep that in mind….
  2. You can apply the following COP file ciscocm.free_common_space_v1.3.k3.cop.sgn. This little beauty will remove any software tied to the inactive partition of the system which may include software tied to the common partition, thus giving you your required space. This is a really cool idea/theory, but I’ve had mixed results.
  3. This is the scariest sounding one, but its actually not that bad. There is a second COP file that you can run. The ciscocm.vmware-disk-size-reallocation-1.0.cop.sgn; This file will allow you to resize your virtual disk in VMWare ESXi and make CM ok with it (I tend to expand 80 gig disks to 160 as long as the physical systems allow it). **Changing the size of the disk without the COP file basically guarantees you a rebuild from scratch and possibly a resume` generating event.** As I said, its not that bad, but there is a catch. In a couple of different cases, your results may vary.

1. If your CM system is running on a snapshot within ESXi, your virtual disk size adjustment option will be grayed out, this will inevitably cause you to panic and wonder if a PCD migration is your only option, its not. You can actually delete the snap shot and once you do that you should be able to change your disk space. Once you do this, restart your VM and let it go through its process. It will reboot 2 times during the start-up process as it expands the disk in the “BIOS” and then in the initial CM boot process If you’ve done it correctly you’ll see your partitions aligned and your new disk size in both the CLI and web console.

2. In some cases the allocation of your virtual disk may be as large as the blocks with in the disk controller will allow it to be. If this is the case, you have two options. Option 1 (see option 1 above). Options 2, migrate instead of upgrade using PCD. It will take more time but you and/or your customer’s data should be safe and back where it belongs.

Whew… that was a long post. I hope it helps someone. For those of you new to upgrades, you’re lucky, they keep getting easier. If you have questions, leave a comment and we can have a discussion. Thanks for reading!


-Justin

The Telecommunications Engineer’s Toolkit

With a title like the one above, this post could go in several different directions. For the purposes of this entry I am talking about a physical toolkit i.e. all of those handy telecommunications tools that make the nuances of any voice install; analog, digital or yes even IP more productive.

“But Justin,” you may say “I use the web to log into CUCM and I ssh into my voice gateways, I have a laptop and a console cable, what other tools do I need?”

I’ve softened to the question above in recent years. Rather than just reaching through my screen and slapping the crap out of the reader, I simply shake my head in disappointment…Really?

I get that with the ever increasing prevalence of ITSPs and advancements in faxing and other legacy voice related appendages that there may in fact be an entire crop of telecommunications engineers that think that a laptop and console cable are really the only tools that they need, but I respectfully beg to differ. Can your laptop help you get to the bottom of the now infamous “Ethernet Disconnected” message on a Cisco phone? Can it help you put an RJ11 end on a piece of silver satin if you need a backup POTS line into your voice gateway? Can it help you tone out mysterious devices/circuits/gremlins when migrating from a legacy system to an IP solution? If you answered yes to any of these questions, I think I want to buy your laptop, if you answered no, you need tools.

My toolkit is more basic than some and far more advanced than others, here is a list of what it currently includes…

  1. Multi-bit ratcheting driver (I carry a power driver as well, but batteries are often fickle).
  2. Punch down tool with both 66 and 110 block blades.
  3. Crimping tool for putting on RJ11 and RJ45/48 ends (mine also does coax, but that doesn’t usually come into play).
  4. Outer sheath cutter for CAT5E/6 cable.
  5. Lineman’s scissors
  6. RJ45 and RJ11 male ends
  7. Telecom Butt-Set w/ Banjo
  8. Toner
  9. RJ45 and RJ11 cable tester (mine includes remote plugs for port identification which have proven to be really handy).
  10. T1 Loopback plug
  11. Bulk Cat6 cable (just enough to make a few patch cables, no need to lug a box of cable everywhere you go).
  12. Label Maker

I keep a few other miscellaneous things in my bag but the above items go where I go.  I may not use all of my tools on every job, but more times than not I’ve went to a job thinking I wouldn’t need them and I’ve ended up using them. If your employer provides these tools for you, that is great, I have my own because as I said before…they go where I go.

What do you carry in your toolkit? Have something that you love that you think I should add? Want more information? Leave your feedback below!

-Justin


Cisco Prime Collaboration Provisioning – Canceling Failed Orders & Wait State Orders

Cisco’s Prime Collaboration Provisioning (formerly Cisco Unified Provisioning Manager) tends to invoke one of two distinct responses from Collaboration folks; seething hate or mild disdain. While I have several historical reasons to be a part of one or both of these camps, I actually like PCP and when it is installed correctly and used for what it was designed to be used for, I find it to be an effective and handy application.

With all of that said, if you’ve used PCP for than a minute, you know that it can be fickle when it comes to pushing through bulk orders and completing tasks. You’ve probably had a bulk order that just sat there and sat there and never completed. Maybe you looked in the job log, I hope you did, but if you didn’t you should next time. If your order has permanently seized, you’ll see a “wait” statement. If you see this “wait” statement, your job will not complete. Basically the wait statement means that PCP encountered a problem that it does not have a definition for. If it had a definition, the job would end with an error and all would be good (albeit still with an error, but complete). For example, if you have an LDAP synchronized CUCM but for whatever reason the user ID that PCP has and the user ID that CUCM has are different PCP will try to create a user in CUCM and CUCM will tell it “no”. No, should be an error, but not to PCP in this case. On a side note if you look at a successful job in progress you’ll see a “sleep” statement. Sleep means that the prerequisites are complete and PCP is just waiting for all of the requested changes to be completed in the downstream system before it completes its job. In PCP terms “wait” is bad “sleep” is good.

When you run into one of these “permanently seized” errors, you can reboot the box and hope that whatever gremlins caused the order to fail are dead and gone, but shouldn’t there be a better way? There is.

**There is a timeout value on the wait statements, so if you want to wait for the order the fail naturally you can, but during a deployment, time is almost never your friend.**

I found this little bit of joy on a Cisco forum a couple of years ago and I think it is a good tool to keep in your back pocket when working with PCP. This command does require root access, but you create a password for the root user when you install/setup PCP so that isn’t a problem.

/opt/cupm/sep/ipt/bin/AbortOrders.sh globaladmin <password> <order_number> -forced

The command above cancels all parts of a fouled/never ending order. To run this command you must SSH to the PCP box using root credentials. You must also have access to the globaladmin credentials, but hopefully that won’t be a problem.

Once you cancel the order in question, you can go back and fix whatever the problem may have been and reattempt the job.

I hope this long winded bit of information helps someone out there. If you have questions or comments, leave them below.

-Justin


The Aftermath of My First CCIE Collaboration Attempt

A few days ago I wrote about attempting my first CCIE Collaboration Lab.

Its the night following my attempt and I’ll be honest, it did not go well. I was confident going in and I was confident for the first 3 or so hours. When we broke for our “speed lunch” I knew I was behind and as the hours,minutes and seconds ticked down in the afternoon I realized without much resistance that I was screwed.

That being said, my expectations were probably not properly metered. It was my first attempt and according to the most “recent” Cisco numbers that I have read, first time passing attempts are not common.

I also think that there are lessons to be learned, even in failure. I’ll list a few of them below.

  1. I was worried, going in, about things like the IOS and UCM Dial Plans, I’m pretty sure I nailed those.
  2. Unity Connection in either form i.e. SCCP or SIP is a relatively mindless process and I think I owned both of those sections as well.
  3. I do not know IOS switch QoS as well as I thought I did, that will have to change.
  4. Cisco Unity Express (CUE) is a bastard in any form and things that I assumed would work because they always have in my practices kicked my ass.
  5. Mobile Voice Access: This little gem was on my lab and none of the studying that I have done covered it in any way shape or form. I implemented it 5 or 6 years ago in a production environment but those brain cells were not present today. I guess I’ll be learning MVA.
  6. I didn’t read or see anything in the lab that honestly had me confused, I did however run out of time. I need to be faster, I must be faster.

Where does this leave me?

It leaves me with no CCIE number, it resets my written countdown clock but my goal is my CCIE number and without that this, even though I learned a lot, was a failure.

Tomorrow morning I’ll hop on a flight and head back to Denver. I’ll continue to study and work towards my goal.

I’ll be back Cisco, I’ll definitely be back.

-Justin


Prepping for My First Crack at the CCIE Collaboration Lab Exam

Well its finally here… On 4/26 I’ll sit for my first crack at the CCIE Collaboration Lab Exam in RTP.

I am excited and nervous but more than anything ready to get in there and do it!

After last week’s final (so far) demise of IP Expert, which I had rack rental tokens with, I was forced to shell out some cash for time on the INE racks. I don’t mind the INE racks but I seriously believe that had they stayed in business, the ProctorLabs (IP Expert rack rentals) would have been much better.

My home lab setup while better than some was not nearly verbose enough to allow to me study and prepare the way I wanted to. I could have probably built something at work to do the job, but I’ve been fortunate enough to have been given this week for nothing but prepping and going into the office just sounded like a bad idea. INE allows for a L2VPN connection to their equipment which allows me to use my own phones and thus get the “touchy feely” prep for the lab as well as the technical practice.

20160422_124014

With regards to the technical practice, I found a supposed lab scrape on a forum (don’t ask I don’t remember which one) and I have materials from when I attended an IP Expert CCIE Collaboration Lab 10 day boot camp last December. The IPs are different but the technology is the same.

As an engineer that’s been working in the Cisco AVVID space for 12+ years now, I’ve developed some bad habits and while it has been painful, I think my lab prep and study have helped me break at least some of them. For those in the same position, my best advice is below…

  1. Read. Don’t assume you know because you’ve seen it all before, just read.
  2. Think on your feet. Because you may have seen it all before (see point 1) you probably can figure out what just about anything the exam throws at you.
  3. Do you play the points vs. finishing game?  No idea. I’ll let you know after 4/26.

I guess I’m not truly sure how long 8 hours is, but I hope I can at least make a decent showing. My confidence right now after a week of prep is high but we’ll see what stepping into the exam room on Tuesday does to me.

Wish me luck!

-Justin


Cisco Jabber SRV Records: Being a Knowledgeable & Helpful Collaboration Engineer

If you’ve deployed Cisco’s IM & Presence (formerly Cisco Unified Presence or CUPS) and its associated Jabber product line, you know all about DNS SRV records, or at least you should.
If you don’t know about them or if you are a little rusty, Cisco has a good document (link below) that you should get to know intimately…
http://www.cisco.com/c/en/us/td/docs/voice_ip_comm/jabber/Windows/9_7/CJAB_BK_C606D8A9_00_cisco-jabber-dns-configuration-guide.html

SRV records allow servers to advertise service locations within the core of the DNS architecture. For example: _cuplogin._tcp.example.com is an SRV record the Jabber looks for during service discovery and sign-in. The record above points at the IM & Presence service across port 8443 which happens to be what Jabber/IM&P uses for authentication. There are SRV records that Jabber looks for for directory services as well as Collaboration Edge (Cisco Expressway) which is its own animal.

Without SRV records flexible Jabber deployment becomes difficult and Collaboration Edge integration becomes next to impossible.

So we know that SRV records are important, but are they really our problem as Collaboration Engineers? I guess that depends on how broad your IT shop or your customer’s IT shop is. You may have, at your disposal, wonderful Server Engineers who know DNS like you know Call Manager, but not every situation is that clean.

I realize that not every enterprise uses Windows for internal DNS, but since the majority seem to, we’ll cover Windows DNS. My system is a 2008 Server Standard instance.

– What SRV records do we need to add? Cisco gives us a good run down in the document referenced above, I copied the below passage from that document.

The following is an example of the _cisco-uds SRV record:
_cisco-uds._tcp.example.com 
priority       = 1
weight         = 5
port           = 8443
svr hostname   = cucm1.example.com

The following is an example of the _cuplogin SRV record:
_cuplogin._tcp.example.com
priority       = 5
weight         = 100
port           = 8443
svr hostname   = cup1.example.com

**There are additional records required for Collaboration Edge**

In the outputs above, you’ll see the SRV record and its priority, weight, port  and host the has the service. You’ll notice in the SRV record itself that TCP is called out. If these were UDP SRV records you would of course see UDP in the SRV.

– How does this translate to Windows DNS? Pretty easily actually…

Below is the DNS Manager screen from my server.

                      DNS Management

You’ll see that under my domain’s Forward Lookup Zones there are several folder entries including _tcp, _udp, and others.

If you right click on the domain (image below)  you’ll able to add Other New Records and from here you can select SRV records

New Other RecordsSelect SRV Record Type

Once you select your SRV record type you can begin configuring the SRV record (shown below)

SRV Record Config

Once you fill in the particulars and click OK, you’ll see your record(s) under the _tcp organizational folder (shown below)

Show SRV Records

From there, repeat the process to add the other records that you need.

We haven’t really talked about priority and weight and they do exactly what you might expect them to do. Multiple systems can respond to the same SRV record within the same DNS domain. Like anything else, someone has to be first. Assigning a priority and a weight allows you to both build redundancy and load balance across multiple hosts. For instance if you have a CUCM PUB and a SUB, you may be want the SUB to respond first and thus would give it a higher priority for its _cisco-uds record.

In closing, you may never need to know how to add SRV records but if you do, hopefully you’ll remember this post and be successful in your deployment.

-Justin