Quick & Dirty: Cisco Modern Router (ISR, ASR) Software Upgrades

Hello World!

Just a quick post today, and my usual apology for not posting more frequently.

If, like me, you find yourself doing ISR IOS XE upgrades, you realize that although it can be a quick process there is always room for improvement.

Today, while upgrading 15+ ISR 4451 CUBE routers, I decided to quickly “notepad script” my upgrade commands. For reference I am using an SFTP server for this upgrade but the plan works for FTP or TFTP if you wish.

My quick and dirty notepad script looks like this…

copy sftp: bootflash:
IP ADDRESS OF SFTP SERVER
USERNAME for SFTP SERVER
REMOTE SOFTWARE-PATH
LOCAL SOFTWARE-PATH
PASSWORD for SFTP SERVER
! (for Enter)

A quick copy and paste and the process has started. Once the copy is successful, a second quick and dirty script will change the boot path and then reboot your router.

config t
boot system bootflash:IOSXEFileName
exit
wr mem
reload
y

There is nothing special here, and there are far more elegant solutions but this works for me and hopefully it can work for you!

Justin

Advertisement

CUCM: TLS 1.2 and Legacy Phones

Hello world!

Today’s post will be quick and dirty but hopefully useful.

In Cisco Call Manager (CUCM) version 11.5(1)SU3 support was introduced for Transport Layer Security (TLS) versions 1.1 and 1.2. Prior to this release 1.0 was the only supported version. With security being the driving factor in much of the IT world these days, there is a push to secure everything to the highest available level, that includes the Collaboration environment. I have many customers that want to take advantage of the higher TLS version levels and that is a good thing, but there are gotchas.

If you know anything about Cisco IP phone communications you know that several services; and specifically the Corporate and Personal directory service are pre-configured applets that run between the phone and CUCM. In the case of the directory service(s) they talk using 8443 which is a secure port and thus uses a certificate to communicate (along with the Trust Verification Service (TVS)). That certificate is directly encrypted with the help of TLS. Because support for the newer/higher TLS versions has only recently come into play there are several generations of IP phones that do not support anything above TLS 1.0 (or 1.1 in some cases). This list of legacy endpoints includes the 7900 series and Cisco’s previous “Cadillac” the 9900 series as well as others.

If you have legacy endpoints and change your TLS version to something above 1.0 you will notice that the directory services on those endpoints will fail with a “Host not found” error. What is actually happening involves a failed TLS handshake between the phone and the Trust Verification Service (TVS) on CUCM. Because the phone cannot communicate with the TVS using TLS 1.2 the handshake fails and the directory service cannot be accessed.

So what are your options?

  1. Replace your legacy phones, there is always a financial fix and this is it.
  2. You can manually create a directory service that talks HTTP and assign it to the phones. You could make this an Enterprise Subscription if you want everyone to use it. The URL that you should use is: http://YOURCUCMFQDNorIPHere:8080/ccmcip/xmldirectory.jsp. Since this is an HTTP service you can use the IP instead of the FQDN. This will allow the service to function whether name services are functional or not. This will require user training but may make the most sense depending on the environment.
  3. Revert to TLS 1.0. This sounds easy, but there are gotchas here too.

The gotchas of going back…

Switching from TLS 1.0 to TLS 1.1 or 1.2 (If you are going to change, go to 1.2) is a relatively straight forward process. You log into the platform CLI of your CUCM publisher and any subscribers and issue the following command set tls min-version 1.2. When you enter this command you will be asked to confirm and once confirmed (with yes) the system will restart. This happens immediately and should only be done during a maintenance window.

Switching back from TLS 1.2 to 1.0 follows the same steps with the same command and the same reboot process. However, when you switch back from a higher TLS version to a lower TLS version, anything that was encrypted using that higher TLS version becomes invalid. This includes certificates (which automatically regenerate) and also the application UI password store  (including your CCM Administration credential). This password must be reset from the CLI and changed to something different before you can log into the system again. Note that this does not change your Prime License Manager (PLM) admin password if co-resident with your CUCM.

Security is important and continually making our security better is the only way to prevent incidents. With that said, proper planning will stop security changes from turning into outages.

Cisco’s TLS 1.2 Compatibility Matrix: https://www.cisco.com/c/en/us/td/docs/voice_ip_comm/uc_system/unified/communications/system/Compatibility/TLS/TLS1-2-Compatibility-Matrix.html

CUCM: The Logout Profile

Good Morning Readers!

Today’s post is quick and dirty. If you work in an environment where Extension Mobility is widely used, the content of this post is probably common knowledge and you can stop reading here if you like.

For those curious about Extension Mobility, there are a ton of resources on the Internet that can show you how to use and configure it as well as how it impacts your CUCM licensing. If you don’t know what CUCM stands for, this probably isn’t the post for you.

I was recently dealing some odd behavior from one of the 7841 IP Phones in my lab. Despite the fact that I had logged out my Extension Mobility (EM) user, their details (their User Device Profile) were still showing up on the physical phone. I reset the phone, checked the cluster for DB errors, and scratched my head a lot. I then proceeded to smack my head when I remembered the logout profile configuration in CUCM.

If you know anything about Unified Communications Manager Express (UCME), you know that the logout profile is very common on this platform. EM cannot exist on UCME without it. In CUCM we get spoiled, we can use existing device configuration details and do not have to specify a logout profile, there is however still a place for one.

In a perfect world a logged out EM configuration (in CUCM) should look like this:

This denotes that when a user logs out of the phone, the phone will use whatever configuration data exists in CUCM.

If however, a logout profile gets set (as shown below), the phone will display that profile upon an EM logout.

This is exceptionally confusing when the profile that was just logged out happens to also be the logout profile!

Obviously this was a misconfiguration on my part. Instead of just checking the box to enable Extension Mobility, I also specified a user profile. This lead to several minutes (a good half hour) of me troubleshooting a problem that inevitably had no problem at all.

Thanks for reading and hopefully you got some enjoyment laughing at my screw-up.

-J


Cisco’s Virtual CUBE & Modern IOS Toll Fraud Security

Good Morning Web World!

I found myself with a little bit of time this morning and I thought I’d share a bit of my latest tinkering.

Those of you that have followed this blog for a while may remember my first post where I talked about pointing a CUBE through an ASA out to my ITSP, Flowroute. That post is located here for your reading pleasure.

While the software/hardware has changed with my setup the idea is basically the same. I still have a CUCM system (now 11.x) running with a phone (I’ve felt like being different lately so currently I’m using a retro 7985G as my endpoint (G in this case does not mean Gigabit)). I also have a firewall, a Cisco 5506-X (it was time for an upgrade from the 5505) and I do still have a CUBE. My previous CUBE was a 3825 and it worked wonderfully but the 3825 has long since outlived its relevance in today’s enterprise environments. In my stack of possibilities I also have a 2921 and while it is still a very powerful and valid router, it just seems too easy.

Simple and straight forward is great but only until you’ve done simple and straight forward, then it becomes time to mix it up.

To that end, my replacement CUBE is virtual. Yes, I said virtual. If you follow Cisco and their products, you may already know about the Cloud Services Router, the CSR1000V. The CSR1000V is a virtual router that runs on a VMWare ESXi host. It runs IOS XE though there is some Linux/Unix on the backend that makes it tick.

ESXI Virtual CUBE

Virtual CUBE Show Commands


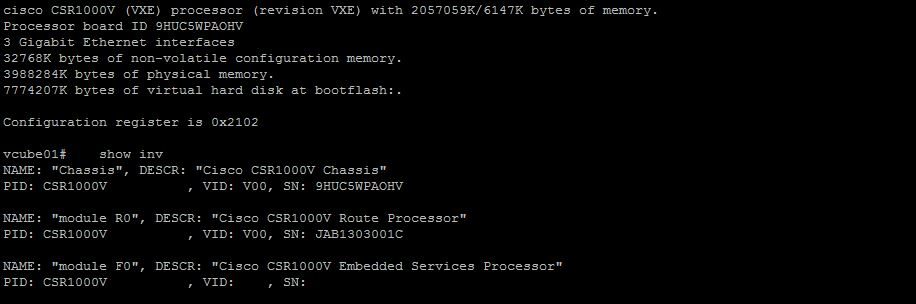
When I first heard that it was possible to turn a CSR1000V into a CUBE, I was skeptical. As I have worked through the configurations and witnessed it work, I must say I am impressed.  The configuration is the same as with any other IOS XE router with exception of the interface naming conventions. There are three (3) Gigabit Ethernet interfaces and they are named Gigabit Ethernet 1, Gigabit Ethernet 2 and Gigabit Ethernet 3.  The configuration in ESXi is shown below.

CSR1000V Interfaces Config

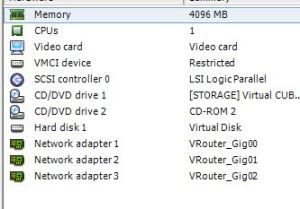
In my case, I created three (3) separate interfaces on my vSwitch and pointed them at three (3) separate VLANs in my infrastructure. You could bond/Port Channel these interfaces if you wanted too but you will still be limited by the throughput of your host’s uplink(s).

A few important things to note…

  • When you deploy the OVA file in ESXi you are given a choice of multiple router “sizes” i.e. memory and processor. I am using the smallest size which is one vCPU and 4GB of vRAM. Some of the larger installations require an additional license.
  • Keep in mind that I am testing this configuration in a controlled lab environment. I am not sure of scalability and if you read Cisco’s CUBE configuration guide, located here, you’ll see that the virtual CUBE does have several restrictions that may make it impractical for some organizations.
  • The CSR1000V is a fully license-dependent platform. Once the demo runs out the router runs, but only with throttled performance. If you intend to deploy this solution, you will have to purchase licensing.
  • In my previous post, my 3825 CUBE was running 12.4 IOS which did not include Toll Fraud Prevention, starting in 15.x and moving through IOS XE you need to be mindful of TFP and what it means when you are trying to make/receive calls on a Cisco H.323 or SIP Gateway.

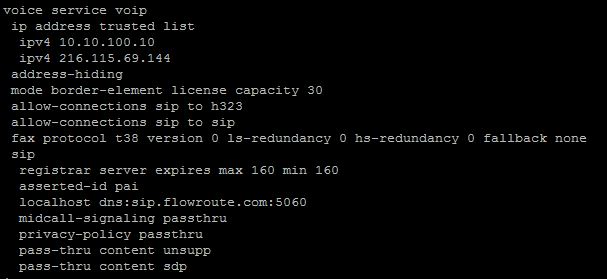
Let’s talk for a moment on Toll Fraud Prevention. As stated above, all modern IOS and IOS XE versions include Toll Fraud Prevention mechanisms and if you use a router, physical or virtual, for voice you need to be aware of them.

Voice Service Config


If you look at the configuration snippet above, you’ll see that in the voice service configuration there is a trusted IP Address list. That list contains the IPs of my ITSP and my CUCM. If I remove those IPs from the list, calls fail. If you are linking your CUBE or gateway to multiple CUCMs or other systems you’ll want to have those IPs in that list as well. What this list does is let the good/known IPs in to complete transactions/calls on the gateway/CUBE and keeps the unknown/bad IPs out to prevent them from placing calls on the system. IP addresses that are part of dial peers will be added to the list automatically but will not show up in the configuration.  If you’ve ever set up an IP PBX on internet, you know that Toll Fraud is a real and serious threat. If you don’t want or need this feature you can turn it off by entering “no ip address trusted authenticate” in your voice service configuration. This is not a recommended configuration but in your environment the TFP mechanisms may do more harm than good.

Thanks for reading, I hope this has been informative.

-Justin

The Upgrade Follies: Communications Manager 9.x to 11.x

If you’ve been in the Cisco voice game for more than a second, you’ve probably done a Call Manager upgrade or two. In my case, I lost count around version 4.1 to 4.3. My record for the longest upgrade that I was a part of is 72 hours…straight! It was painful but such was life back in those days.

With the advent of virtualized Cisco voice and all of its associated parts the upgrades have definitely improved, but that does not mean that the gotchas aren’t still lurking.

For one of my current customer projects I am upgrading a virtualized 9.x environment to 11.x. Unity Connection was upgraded first using CLI. CUC luckily doesn’t have a whole lot of gotchas assuming the engineer that built it originally used an OVA template and followed the correct steps. All you need to do is apply the new “keys” COP file (ciscocm.version3-keys.cop.sgn) and you are good to go. Maybe it isn’t quite that easy, but you get the picture. Communications Manager (Call Manager) is a far different animal. For the sake of automation, I’m doing the CM upgrade using Prime Collaboration Deployment (PCD). PCD is a separate application server that comes with your upgrade order on Cisco’s Product Upgrade Tool (PUT). PCD basically allows you to take a CM cluster (including IM&Presence) and script the upgrade so that you can basically click once and wait. If only it were that easy…

There are a couple gotchas that I’ve learned the hard way. I’ll list them below, hopefully they can help you out during your next upgrade.

  1. Licensing. If you are going to do an upgrade, do your homework. I could write an entire post on licensing but for a 9.x to 11.x upgrade it really just involves doing clean up. If you are getting that ugly little licensing warning from Cisco when you log into your system, clean it up before attempting to upgrade, you’ll save yourself from a lot of pain later.
  2. Disk Space. I get it, hard drive space is cheap, but OVAs are not future proof. The original mid-size build OVA for CM 9.x specified an 80 gig virtual drive. The 80 gig drive model is not not supported by fresh 11.x installs. What bites engineers in the ass is a pesky little storage location known as the common partition. When the 11.x upgrade script first verifies that an upgrade is possible, it checks the amount space available in that common partition, if less than 25 gigs space is available the upgrade will fail. There is an excellent Cisco Support Forums post about this failure here.  So what do you do if the above scenario is true?

There are 3 options…

  1. You can go into your server’s TFTP directory and manually remove old crap that you don’t need. If you happen to remove crap that you do need, bad things WILL happen, so keep that in mind….
  2. You can apply the following COP file ciscocm.free_common_space_v1.3.k3.cop.sgn. This little beauty will remove any software tied to the inactive partition of the system which may include software tied to the common partition, thus giving you your required space. This is a really cool idea/theory, but I’ve had mixed results.
  3. This is the scariest sounding one, but its actually not that bad. There is a second COP file that you can run. The ciscocm.vmware-disk-size-reallocation-1.0.cop.sgn; This file will allow you to resize your virtual disk in VMWare ESXi and make CM ok with it (I tend to expand 80 gig disks to 160 as long as the physical systems allow it). **Changing the size of the disk without the COP file basically guarantees you a rebuild from scratch and possibly a resume` generating event.** As I said, its not that bad, but there is a catch. In a couple of different cases, your results may vary.

1. If your CM system is running on a snapshot within ESXi, your virtual disk size adjustment option will be grayed out, this will inevitably cause you to panic and wonder if a PCD migration is your only option, its not. You can actually delete the snap shot and once you do that you should be able to change your disk space. Once you do this, restart your VM and let it go through its process. It will reboot 2 times during the start-up process as it expands the disk in the “BIOS” and then in the initial CM boot process If you’ve done it correctly you’ll see your partitions aligned and your new disk size in both the CLI and web console.

2. In some cases the allocation of your virtual disk may be as large as the blocks with in the disk controller will allow it to be. If this is the case, you have two options. Option 1 (see option 1 above). Options 2, migrate instead of upgrade using PCD. It will take more time but you and/or your customer’s data should be safe and back where it belongs.

Whew… that was a long post. I hope it helps someone. For those of you new to upgrades, you’re lucky, they keep getting easier. If you have questions, leave a comment and we can have a discussion. Thanks for reading!


-Justin

The Telecommunications Engineer’s Toolkit

With a title like the one above, this post could go in several different directions. For the purposes of this entry I am talking about a physical toolkit i.e. all of those handy telecommunications tools that make the nuances of any voice install; analog, digital or yes even IP more productive.

“But Justin,” you may say “I use the web to log into CUCM and I ssh into my voice gateways, I have a laptop and a console cable, what other tools do I need?”

I’ve softened to the question above in recent years. Rather than just reaching through my screen and slapping the crap out of the reader, I simply shake my head in disappointment…Really?

I get that with the ever increasing prevalence of ITSPs and advancements in faxing and other legacy voice related appendages that there may in fact be an entire crop of telecommunications engineers that think that a laptop and console cable are really the only tools that they need, but I respectfully beg to differ. Can your laptop help you get to the bottom of the now infamous “Ethernet Disconnected” message on a Cisco phone? Can it help you put an RJ11 end on a piece of silver satin if you need a backup POTS line into your voice gateway? Can it help you tone out mysterious devices/circuits/gremlins when migrating from a legacy system to an IP solution? If you answered yes to any of these questions, I think I want to buy your laptop, if you answered no, you need tools.

My toolkit is more basic than some and far more advanced than others, here is a list of what it currently includes…

  1. Multi-bit ratcheting driver (I carry a power driver as well, but batteries are often fickle).
  2. Punch down tool with both 66 and 110 block blades.
  3. Crimping tool for putting on RJ11 and RJ45/48 ends (mine also does coax, but that doesn’t usually come into play).
  4. Outer sheath cutter for CAT5E/6 cable.
  5. Lineman’s scissors
  6. RJ45 and RJ11 male ends
  7. Telecom Butt-Set w/ Banjo
  8. Toner
  9. RJ45 and RJ11 cable tester (mine includes remote plugs for port identification which have proven to be really handy).
  10. T1 Loopback plug
  11. Bulk Cat6 cable (just enough to make a few patch cables, no need to lug a box of cable everywhere you go).
  12. Label Maker

I keep a few other miscellaneous things in my bag but the above items go where I go.  I may not use all of my tools on every job, but more times than not I’ve went to a job thinking I wouldn’t need them and I’ve ended up using them. If your employer provides these tools for you, that is great, I have my own because as I said before…they go where I go.

What do you carry in your toolkit? Have something that you love that you think I should add? Want more information? Leave your feedback below!

-Justin


Cisco Prime Collaboration Provisioning – Canceling Failed Orders & Wait State Orders

Cisco’s Prime Collaboration Provisioning (formerly Cisco Unified Provisioning Manager) tends to invoke one of two distinct responses from Collaboration folks; seething hate or mild disdain. While I have several historical reasons to be a part of one or both of these camps, I actually like PCP and when it is installed correctly and used for what it was designed to be used for, I find it to be an effective and handy application.

With all of that said, if you’ve used PCP for than a minute, you know that it can be fickle when it comes to pushing through bulk orders and completing tasks. You’ve probably had a bulk order that just sat there and sat there and never completed. Maybe you looked in the job log, I hope you did, but if you didn’t you should next time. If your order has permanently seized, you’ll see a “wait” statement. If you see this “wait” statement, your job will not complete. Basically the wait statement means that PCP encountered a problem that it does not have a definition for. If it had a definition, the job would end with an error and all would be good (albeit still with an error, but complete). For example, if you have an LDAP synchronized CUCM but for whatever reason the user ID that PCP has and the user ID that CUCM has are different PCP will try to create a user in CUCM and CUCM will tell it “no”. No, should be an error, but not to PCP in this case. On a side note if you look at a successful job in progress you’ll see a “sleep” statement. Sleep means that the prerequisites are complete and PCP is just waiting for all of the requested changes to be completed in the downstream system before it completes its job. In PCP terms “wait” is bad “sleep” is good.

When you run into one of these “permanently seized” errors, you can reboot the box and hope that whatever gremlins caused the order to fail are dead and gone, but shouldn’t there be a better way? There is.

**There is a timeout value on the wait statements, so if you want to wait for the order the fail naturally you can, but during a deployment, time is almost never your friend.**

I found this little bit of joy on a Cisco forum a couple of years ago and I think it is a good tool to keep in your back pocket when working with PCP. This command does require root access, but you create a password for the root user when you install/setup PCP so that isn’t a problem.

/opt/cupm/sep/ipt/bin/AbortOrders.sh globaladmin <password> <order_number> -forced

The command above cancels all parts of a fouled/never ending order. To run this command you must SSH to the PCP box using root credentials. You must also have access to the globaladmin credentials, but hopefully that won’t be a problem.

Once you cancel the order in question, you can go back and fix whatever the problem may have been and reattempt the job.

I hope this long winded bit of information helps someone out there. If you have questions or comments, leave them below.

-Justin